One of the most enjoyable parts about writing code is writing efficient and performant functionality. No matter how fast your code is, if your server itself isn’t running to it’s maximum performance, you’re not delivering your site as fast as you could be. By setting up Nginx and the new HHVM , you can get your server delivering fully loaded pages faster than most servers answer a request.
HHVM is an open-source virtual machine designed for executing programs written in Hackand PHP. HHVM uses a just-in-time (JIT) compilation approach to achieve superior performance while maintaining the development flexibility that PHP provides.
It is worth noting that HHVM isn’t 100% compatible with all of PHP, so if you’re using obscure functions, you may run into an issue. In all of my testing of WordPress, I never once had this problem, but it is something to keep in mind.
In this post, we’ll set up both Nginx and HHVM from scratch, and then install and setup WordPress. If you follow this guide, you can have an insanely fast server setup in less than an hour.
This post is written for specifically Ubuntu 12.04 LTS and 14.04 LTS. The steps outlined will probably work on other versions, and with some modifications most likely anywhere. I prefer Ubuntu, though. I’ll be going through this on a Ubuntu 14.04 LTS installation.
I’m taking these steps on a brand new Digital Ocean VPS droplet, but you can use the server of your choice.
We want to start with a brand new installation, and install everything we will need. Our first step is updating all of the built in software, and then installing some small useful tools we will want.
$ sudo apt-get update
$ sudo apt-get install -y unzip vim git-core curl wget build-essential
The -y flag we’re using for apt-get install will tell apt that we want to answer Yes to every question about whether or not we want to install a package. Because we’re also running as root (sudo), we want to only install from trusted sources, like the ones that are already added to Ubuntu.
We now want to install Nginx. It’s also possible to run HHVM with Apache, but our goal is speed and performance so we want to use Nginx. Nginx is a reverse proxy server, as well as a normal web server, and also gives us nice load balancing and caching.
The entire goal of Nginx and HHVM is to speed up everything our webserver does to create our final HTML pages that WordPress generates.
Installing Nginx is actually super simple on a new Ubuntu installation. We tell ‘apt’, our handy package manager how to find Nginx, and then we can just do a ‘apt-get install’ like we did previously.
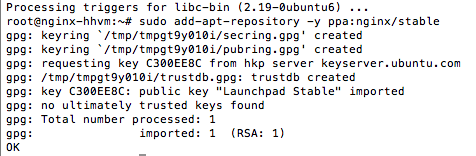
$ sudo add-apt-repository -y ppa:nginx/mainline
After we do this, we want to do another at-get update to fetch the Nginx package we just told ‘apt’ about. Now we’re ready to install Nginx.
$ sudo apt-get install -y nginx
That’s it! Nginx is installed. We’ll configure it in just a bit.
Now we’re ready to install HHVM. For Ubuntu 12.04 and 14.04, we can follow the official guide .
Ubuntu  12.04: $ sudo add-apt-repository -y ppa:mapnik/boost
$ wget -O - http://dl.hhvm.com/conf/hhvm.gpg.key | sudo apt-key add - $ echo deb http://dl.hhvm.com/ubuntu precise main | sudo tee /etc/apt/sources.list.d/hhvm.list
$ sudo apt-get update
$ sudo apt-get install -y hhvm Ubuntu  14.04: $ wget -O - http://dl.hhvm.com/conf/hhvm.gpg.key | sudo apt-key add - $ echo deb http://dl.hhvm.com/ubuntu trusty main | sudo tee /etc/apt/sources.list.d/hhvm.list
$ sudo apt-get update
$ sudo apt-get install -y hhvm
So far, everything goes pretty smoothly. The longest part is probably waiting for the server to pull in all of the packages for the ‘apt-get update’ every time.
After installing HHVM, we get a pretty handy message.
********************************************************************
* HHVM is installed.  Here are some more things you might want to do:
*  *  Configure your webserver to use HHVM:
	* $ sudo /usr/share/hhvm/install_fastcgi.sh
	* $ sudo /etc/init.d/nginx restart
	* $ sudo /etc/init.d/apache restart
	* $ sudo /etc/init.d/hhvm restart
*  *  Start HHVM at boot:
	* $ sudo update-rc.d hhvm defaults
*  *  Run command line scripts with HHVM:
	* $ hhvm whatever.php
*  *  Use HHVM for  /usr/bin/php even if you have php-cli installed:
	* $ sudo /usr/bin/update-alternatives --install /usr/bin/php php /usr/bin/hhvm 60
********************************************************************
This is nice because it tells us how to do our next few steps.
First we’ll run the first of the commands they tell us about to resart Nginx and install FastCGI using HHVM.
$ sudo /usr/share/hhvm/install_fastcgi.sh
After this, we want to tell Ubuntu to run HHVM on system start.
$ sudo update-rc.d hhvm defaults
And then we’ll restart HHVM, just for good measure.
$ sudo service hhvm restart
At this point, HHVM is currently running, and will run whenever our server is started up. We can verify that HHVM is installed by creating a PHP file and making sure that HHVM can run it.
$ touch test.php
$ echo " test.php
$ hhvm test.php
We should get a return of “HipHop”. If that’s what you see, we know that HHVM is working perfectly.
At this point, we can start setting up the configuration for a website, but before we do that, there’s another handy command that our HHVM installation results screen gave us to have HHVM “pretend” to be PHP over the command line.
$ sudo /usr/bin/update-alternatives --install /usr/bin/php php /usr/bin/hhvm 60
What this lets us do is use PHP command line tools like WPCLI, PHPUnit, Composer, and all of those things, just like if we were running PHP instead of HHVM.
Let’s test this real quick by doing:
$ php -v
You should get a result like this:

One really nice thing about HHVM and Nginx is there is very little configuration we need to do to start working. We don’t really have to do anything at all and it is already running. The default file location of our files is “/usr/share/nginx/html”, and there is already a simple HTML file there. I like to make an alias so that I can quickly get to this location.
$ echo "www="cd /usr/share/nginx/html"" >> ~/.bashrc
This creates an alias so we can simply type “www” and change to our file directory.
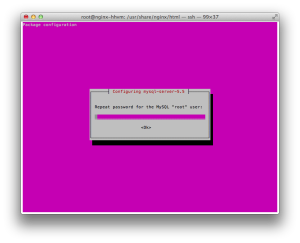
At this point we want to install MySQL, so that we can actually use WordPress, and not just PHP files. Oddly, this portion has more configuration then anything we’ve done up to this point. After running the following command, we’ll get a password screen to set our root password.
$ sudo apt-get install mysql-server
Now we’re ready to install WordPress and set up Nginx to work with it.
We’re going to head to our Nginx HTML folder and grab a copy of wordpress and unzip it.
$ cd /usr/share/nginx/html
$ wget http://wordpress.org/latest.zip
$ unzip latest.zip
And we’ll also do a little housekeeping while we’re here.
$ mv wordpress/* .
$ rmdir wordpress
$ rm latest.zip
$ rm index.html
```
Now we’ll set up our MySQL database.
`$ mysql -u root -pYOURPASSWORDHERE`

Now we’re inside a MySQL prompt inside our SSH prompt inside our terminal program. Prompt-ception!
First we create a database, and then add a user, set that user’s password, give that user permissions, refresh MySQL privileges, and then exit out of our MySQL prompt. Make sure you write down this information, as you’ll need it for wp-config.php later.
```
$ create database databasename;
$ create user username@localhost;
$ set password for username@localhost = password("yourpasswordhere");
$ grant all privileges on databasename.* to username@localhost identified by 'yourpasswordhere';
$ flush privileges;
$ exit;
```
And now let’s create and edit wp-config.php. To edit the file, you can either SFTP in and edit this file locally, or use Nano or Vim on the server. We’ll use Vim.
`$ cp wp-config-sample.php wp-config.php`
`$ vi wp-config.php `
For Vi, to start typing you want to hit ‘i’ to go into insert mode, and when you’re ready to save and quit, just hit ‘ESC’ and then ‘:wq’. It’s confusing, I know.
At this point, we’re ready to set up Nginx to be able to run WordPress. We’re going to edit `/etc/nginx/sites-available/default`.
`$ sudo vi /etc/nginx/sites-available/default`
We want to change two things in our configuration.
We want to change Nginx to also look for PHP files.
```
server {
listen 80 default_server;
listen [::]:80 default_server ipv6only=on;
root /usr/share/nginx/html;
*index.php* index index.html index.htm; # Make site accessible from http://localhost/
server_name localhost;
include hhvm.conf;
}
```
And we want to change how files are loaded.
```
location / {
# First attempt to serve request as file, then
# as directory, then fall back to displaying a 404.
try_files $uri $uri/ /index.php?q=$uri&$args;
}
```
Your complete file should look like [this](https://gist.github.com/bradp/2e71455f9795fb2e6b2d):
```
1. # You may add here your
2. # server {
3. # ...
4. # }
5. # statements for each of your virtual hosts to this file
6.
7. ##
8. # You should look at the following URL's in order to grasp a solid understanding
9. # of Nginx configuration files in order to fully unleash the power of Nginx.
10. # http://wiki.nginx.org/Pitfalls
11. # http://wiki.nginx.org/QuickStart
12. # http://wiki.nginx.org/Configuration
13. #
14. # Generally, you will want to move this file somewhere, and start with a clean
15. # file but keep this around for reference. Or just disable in sites-enabled.
16. #
17. # Please see /usr/share/doc/nginx-doc/examples/ for more detailed examples.
18. ##
19.
20. server {
21. listen 80 default_server;
22. listen [::]:80 default_server ipv6only=on;
23.
24. root /usr/share/nginx/html;
25. index.php index.html index.htm;
26.
27. # Make site accessible from http://localhost/
28. server_name localhost;
29. include hhvm.conf;
30.
31. location / {
32. # First attempt to serve request as file, then
33. # as directory, then fall back to displaying a 404.
34. try_files $uri $uri/ /index.php?q=$uri&$args;
35. # Uncomment to enable naxsi on this location
36. # include /etc/nginx/naxsi.rules
37. }
38.
39. # Only for nginx-naxsi used with nginx-naxsi-ui : process denied requests
40. #location /RequestDenied {
41. # proxy_pass http://127.0.0.1:8080;
42. #}
43.
44. #error_page 404 /404.html;
45.
46. # redirect server error pages to the static page /50x.html
47. #
48. #error_page 500 502 503 504 /50x.html;
49. #location = /50x.html {
50. # root /usr/share/nginx/html;
51. #}
52.
53. # pass the PHP scripts to FastCGI server listening on 127.0.0.1:9000
54. #
55. #location ~ .php$ {
56. # fastcgi_split_path_info ^(.+.php)(/.+)$;
57. # # NOTE: You should have "cgi.fix_pathinfo = 0;" in php.ini
58. #
59. # # With php5-cgi alone:
60. # fastcgi_pass 127.0.0.1:9000;
61. # # With php5-fpm:
62. # fastcgi_pass unix:/var/run/php5-fpm.sock;
63. # fastcgi_index index.php;
64. # include fastcgi_params;
65. #}
66.
67. # deny access to .htaccess files, if Apache's document root
68. # concurs with nginx's one
69. #
70. #location ~ /.ht {
71. # deny all;
72. #}
73. }
74.
75.
76. # another virtual host using mix of IP-, name-, and port-based configuration
77. #
78. #server {
79. # listen 8000;
80. # listen somename:8080;
81. # server_name somename alias another.alias;
82. # root html;
83. # index index.html index.htm;
84. #
85. # location / {
86. # try_files $uri $uri/ =404;
87. # }
88. #}
89.
90.
91. # HTTPS server
92. #
93. #server {
94. # listen 443;
95. # server_name localhost;
96. #
97. # root html;
98. # index index.html index.htm;
99. #
100. # ssl on;
101. # ssl_certificate cert.pem;
102. # ssl_certificate_key cert.key;
103. #
104. # ssl_session_timeout 5m;
105. #
106. # ssl_protocols SSLv3 TLSv1 TLSv1.1 TLSv1.2;
107. # ssl_ciphers "HIGH:!aNULL:!MD5 or HIGH:!aNULL:!MD5:!3DES";
108. # ssl_prefer_server_ciphers on;
109. #
110. # location / {
111. # try_files $uri $uri/ =404;
112. # }
113. #}
```
Now we need to restart Nginx, and start the WordPress installation.
`$ sudo service nginx restart`
At this point you can navigate in your browser to your site and you should be good to go!

Here’s a screenshot a stresstest of a site running default 2014, with the steps outlined above. As you can see, these results are amazing for a $5/month server.