As someone who loves the command line, I’m always striving to make my workflow easier, more efficient, and just overall better. Hopefully, by walking through my set up and my recommendations for the best command line tools, you’ll find some nifty tips and tricks you can adapt to make your workflow better too.
The command line is a scary place if you’ve never been there before. It is. You can do some really powerful and dangerous things to your computer. Today, we’ll walk through some of the things I’ve done to make my command line interactions more pleasant and powerful.
This won’t be an in depth look at everything you can do, but rather a glimpse into what I do. Don’t worry, those of you who are still learning; we’ll start with the easy stuff and work our way up to the more advanced business!
Disclaimer: I work on a Mac, and most of this guide will be centered around that. However, most of these tools will work on Windows and most flavors of Linux.
Easy Installation
Before we get too far into the nitty-gritty of the really technical things, we’ll try to solve one of the things that snags a lot of beginners: installation. Thankfully, there are some tools to make it so we don’t need to run a ton of commands or compile most of the tools we’ll talk about.
On a Mac, that tool is going to be Homebrew . Homebrew is great as it brings one of people’s favorite things for Linux to Mac–the idea of packages and package management. A package manager is a tool that helps you to install software, and then keep track of that so you can easily update it. Also, Homebrew is smart enough to make sure you have all the required dependencies when installing something new. It’s really great, and we’ll talk a bit more about what it can do later.
For now, we’ll run one simple command to install Homebrew:
ruby -e "$(curl -fsSL https://raw.githubusercontent.com/Homebrew/install/master/install)"
Using Homebrew to install things couldn’t be easier. In your terminal, simply do brew install <package-to-install> .
Note: For those of you on Linux, you can replace brew with apt-get, and in most cases it will work. On Windows, many people suggest Chocolatey NuGet
, which will do most of the same things, but doesn’t have quite the same number of packages available.
Your Shell
When you first open up Terminal (or another terminal program), you’ll probably be running the Bash shell. The shell is what processes commands you type and figures out what to do with them. Bash is widely used, and is the default on both Mac and Linux. Bash has also been around for a really long time–twenty five years! I can’t think of many pieces of software that have been around that long and are still used daily by millions.
In this post, we won’t be going over many commands or how to use the command line, but instead covering tools. Check out WebDevStudio’s CLI cheat sheet to learn that.
Zsh
The first customization I’ve done in my terminal is replace Bash with something a bit more powerful and customizable; I use a shell called Zsh . I like Zsh because it’s a lot easier to customize your prompt, and the completion is more powerful than Bash. Other than that, most features are comparable to Bash. Where it shines, though, is with some helper tools (we’ll get to those in a minute).
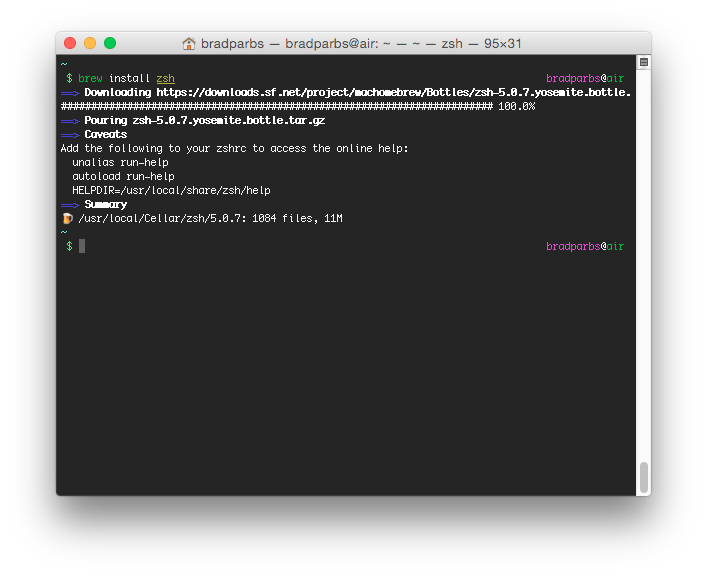
If you want to use Zsh, it’s pretty simple to install, because we now have Homebrew! We’ll just run one command, and we’ll be set.
brew install zsh
You’ll notice after the installation finishes, nothing really happens. We’ll have to change our shell to Zsh, and we do that with a pretty simple command:
chsh -s $(which zsh).
What this does is change our shell to use Zsh everytime we login. Now, simply close your terminal and reopen it, and you’ll be good to go with Zsh.
Oh My Zsh
Now that Zsh is installed, we want to start configuring it to work well for us. One of the easiest ways to start is by installing Oh My Zsh . Oh My Zsh is a Zsh configuration framework, and comes bundled with a ton of Zsh themes and plugins that save you a lot time setting up how you want your shell to look and function.
Installing it is pretty simple, just do
curl -L http://install.ohmyz.sh | sh and you’ll be golden. Once this installation finishes, it will make a reference to check out your new
…and you’ll be golden. Once this installation finishes, it will make a reference to check out your new
Once this installation finishes, it will make a reference to check out your new ~/.zshrc file. This is a hidden configuration file, and this is where you’ll start adding your settings in to make Zsh how you want it. Let’s walk through parts of the default file it creates for you, and some of the changes you’ll want to start making.
Oh My Zsh Configuration
Because it is a “dotfile,” you won’t see the file in your local filesystem, because it is hidden. We have two options, we can either open that in our text editor, or we can edit it in the command line. For now, we’ll open it in our text editor. If you’re using Sublime Text, you can simply run subl ~/.zshrc, if you’ve set up the subl alias
. If you’re using another text editor, you can use the command line option for that.
You’ll notice that most of the options in your .zshrc are commented pretty well, and mostly self-explanatory. The two biggest options we’ll be covering are the ZSH_THEME and the pluginsoptions.
Before we get into those two options, I’ll quickly go over a few other options I recommend. Just add any of these on a new line if you’d like to use them. After you’ve changed a setting, you’ll need to close and reopen your teminal for it to take effect.
COMPLETION_WAITING_DOTS="true"If you’re ever in a large directory and you try to tab complete, this will add some waiting dots so you know that Zsh is still working. A bit more helpful than just mashing the tab key until you see something.ZSH_HIGHLIGHT_HIGHLIGHTERS=(main brackets pattern cursor) ZSH_HIGHLIGHT_PATTERNS=('rm -rf *' 'fg=white,bold,bg=red')This will highlight the patterns you specify in a color of your choice. This example here will highlight any time you typerm -rfin red. This is helpful, asrm -rfis a potentially very dangerous command, and the reminder of that is very nice.setopt RM_STAR_WAITThis will add a 10 second wait before you can confirm a wildcard deletion. Lots of people, myself included, are so used to confirming the removal of files, that we don’t stop to actually read what will be deleted. Better to have it now then add it after you make a mistake!- Some options for our Zsh history. These will set our history to allow a ton more entires, ignore duplicate commands, and ignore some of the commands we don’t need a history of. This is useful because if you want to search for that command you ran a few weeks ago, you can do that a lot easier.
export HISTSIZE=32768;export HISTFILESIZE=$HISTSIZE;export HISTCONTROL=ignoredups;export HISTIGNORE="ls:cd:cd -:pwd:exit:date:* --help";
Now for ZSH_THEME and plugins. First, we’ll start with our theme.
First off is ZSH_THEME, which controls what your prompt looks like. There are quite a lot
of themes available and built into Oh My Zsh, and switching between them is quite easy. You can look through that list of themes or check out zshthem.es
to find one that works for you. The agnoster theme is quite a popular one, though it requires a special font to use. I’m personally a huge fan of muse and have built out a customized theme based on that.
Once you’ve gotten a theme you like, its time to start adding some plugins.
Oh My Zsh Plugins
Oh My Zsh plugins
are fantastic things. It allows you to easily activate a set of aliases, functions, and autocompletions. A good example of a plugin is the one for Homebrew, which we used earlier. By adding brew to the list in plugins=( ). After closing and re-opening your terminal, you’ll now have tab-completion for brew!
If you browse through the list of plugins, you can simply find some tools for you to use and add them in. They’ll hopefully speed up your process, and it’s nice to have tab-completion for installed programs.
The plugins I use are:
brewSimply adds tab completions and abrewscommand.brew-caskAdds tab completions to brew cask (which we’ll cover later).catimgThere are a few Oh My Zsh like this that package an entire script within the plugin, not just tab-completion.catimgis used to display an image in your terminal. This is useful when you quickly want to preview an image before committing it to git or something.gitAdds lots of aliases for Git, as well as tab completion. The most useful alias it provides isgaliased togit, so anytime you want to usegit, you can just dog. There are dozen more aliases that come with this, too.git-extrasThis provides tab completions for the excellent Git extras tool. My favorite thing about this is the commandgit summary, which will show statistics about the current project, who has worked on it, and how long its been in progress.githubAdds tab completion to the Github gem , which will let you fork Github repos, easily clone Github repos, and a lot more things.lolThis is a plugin that simply provides more aliases. I barely ever use this–sometimes just for fun. This will set up alises likeicanhasto create a directory, orgimmehto create a file. You probably don’t need this plugin.nyanThis is an alias tonc -v nyancat.dakko.us 23I’ll let you figure out what it does.osxThis gives you some command line aliases to manipulate Terminal or iTerm. Things liketabto open a new tab,split_tabto divide it in half, and a few other Mac-specific aliases.parbs-sitesThis is a custom Zsh plugin I’ve created to execute some commands and do some tab completion. You can download it and put it in your Zsh Custom folder, which out of the box is~/.oh-my-zsh/custom/plugins, and you’ll want to modify it to fit your filesystem. I use it to quickly jump to my VVV sites I’ve set up with vv .sublimeThis will add thesttcommand, to open an entire directory in Sublime Text, as well as setting up thesublandstaliases to edit a single file.vagrantTab completion for Vagrant .zZ is awesome, and we’ll talk about this in just a bit.zsh-syntax-highlightingThis is one of my favorite plugins, and I recommend it to anyone who is using Zsh. Installation is very simple; all you have to do is clone it into your custom folder, and add it to your plugins list. It will highlight commands in either green or red, depending on if they are actual commands or not.There are dozens more plugins, and if there is a popular command line tool you use, chances are someone has made a plugin to speed up usage of it.
Aliases
A lot of the plugins I’ve listed add aliases, and those are one of my favorite things on the command line. An alias is a way to say “When I type x, actually run y.” This is useful when you have commands that you run on a regular basis that you want to make a bit easier.
To define an alias, simply add alias something="another command" somewhere in your .zshrc. You’ll need to close and repopen your teminal for it to take effect, just like before.
If you have a projects directory, and every day you navigate to that directory, you can easily make an alias to speed that up. I have an alias named box that is set to run cd ~/Dropbox. So when I run box in my terminal, I’m placed in that directory. I also have one for my Sites folder, one for my other working projects, and a few more to ease navigation.
Another great use is when you have long commands, or multiple commands you run together. When I’m using VVV, a lot of times I’ll want to run vagrant up, and then vagrant provision, and then vagrant ssh; so that the box turns on, sets it self up, and then puts me in a command prompt inside of it. So I’ve made an alias
that does that: alias vup="vagrant up && vagrant provision && vagrant ssh".
Any command you run that you find yourself using multiple times, you can probably shorten it up. It’s also really helpful for commands that you can never remember exactly how to call them. For example, I need to copy my public SSH key to my clipboard pretty regularly to add to new servers and things like that. I have an alias that runs that grabs it, copies it, and confirms (to me) it did that. alias pubkey="more ~/.ssh/id_rsa.pub | pbcopy | printf '=> Public key copied to pasteboard.\n'";.
As you can see, you can do some pretty neat things with aliases.
Functions
One downside of aliases is that it’s not very easy to parse arguments you pass in. If I wanted an alias where I could pass in a site name, and it would tail the error log of that site, it would be some tricky work to get that behaving properly. That’s where functions come in.
Here’s that function to tail a log: function wpdebug() { tail -f $1/wp-content/debug.log } .
The $1 in there stands for whatever you pass in. So on our terminal, we’d call this wpdebug ~/sites/vvv/my_site/, and it would tail the log. Functions can be extremely powerful, but we don’t need to go over them in-depth right now. I use functions in the same way I use aliases: to replace commands I don’t to have to type over and over, or to make it a bit faster to type.
This is a function I use as a wrapper to the find command: function f() { find . -name "$1" } As you can see, writing these functions is just as easy as writing an alias.
Breaking .zshrc up
Once you’ve started added some aliases and some functions into your .zshrc file, you’ll notice it starts to get a bit disorganized. When I first started using Zsh, I tried to keep that file organized. Aliases at the top, then functions, then settings, and then other things, but it quickly got out of hand. Thankfully, we can use a pretty handy trick to break it into separate files.
We’re going to be leveraging a command called source. What source does is read a file and execute the contents in the current shell–which is exactly what is happening when .zshrc is read. This is also the reason we’ve had to close and reopen our terminal each time we made a change. Reopening our terminal is re-sourcing that .zshrc file. (Which also means you can run source ~/.zshrc instead of closing and reopening your terminal).
We’re going to use the source command to break up our .zshrc file and make it a bit more manageable. As you can see in my .zshrc file , I’ve broken it up into a few other files: .aliases, .functions, .exports, and .secret.
If you break them up this way, you know exactly where all your aliases, functions, or environment settings are. I also use .secret, because I sync my .zshrc and these other dot-files to Github, and I use .secret to put any aliases that contain passwords or confidential information.
By now, you should have a pretty solid setup with Zsh, Oh My Zsh, and Brew. Lots of people stop here, but we’ll go a bit further down the rabbit hole to make your life even easier.
Z
Earlier, we added z as a plugin in Oh My Zsh, but we didn’t talk about it at all. Z is one of my favorite tools I use. It’s a tool to “jump around,” and it’s magical.
The way you use z is you simply do z <name of a directory> and you’ll be there. You don’t need to cd to some long folder path, you simply type the name of it.
Z works by keeping tracking of every directory you go into on the command line, and weighting them by how many times you’ve done it. So, right after you install Z, it won’t be able to do much, but after a short while, it will start learning which project folders you go into.
You can also specify a few flags, so z -t wp-content will take you to the most recently accessed wp-content folder you’ve been in.
To install z, simple add it to your plugins list in Oh My Zsh, as Oh My Zsh contains the entire code of z.
ag
Z is great when you’re moving to a specific directory, but what if you want to find a certain file or line of code? That’s where the silver searcher comes in. The silver search, aka ag, is great. It is an improvement over the many tools there are for searching on the command line. The biggest thing is that it is SUPER FAST. There are a lot of technical things in does in the background to get that speed, but the thing you should know is that it is fast.
You can easily search your entire codebase for a certain function call, or for a file you can’t remember where it was, anything you want. To put it in perspective, I just searched the entire WordPress codebase for wp_insert_post(), and it returned all the results in less than 1/10 of a second. And this is on a four year old machine. Pretty good.
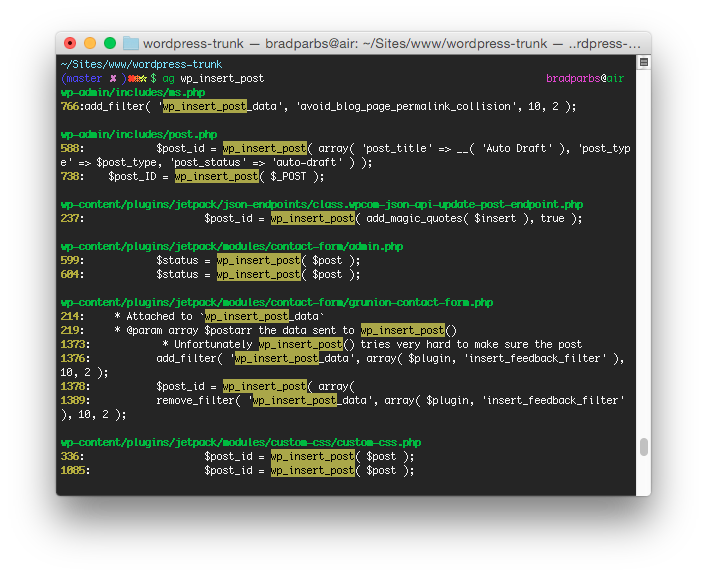
To install ag, simply do brew install the_silver_searcher, and you’re all good to go.
Some more Brew awesomeness
I’ve added quite a few things with Brew, and some of my favorites are:
- git-extras
- git-flow
- tig
- tree
- vv
There are so many package available on Homebrew, so go ahead and try them out!
Brew Cask
We’ve talked a lot about Homebrew, and now its time for one my favorite additions to it: Homebrew Cask . Cask allows you to install Mac applications like Google Chrome. I love that you can also update these applications over the command line. In fact, I’ve set up a script to run every night that updates all of my brew-installed programs, as well as all my cask-installed applications. The other benefit is that you can write a script that will set up a new computer with all of these applications as well.
To install Brew Cask, simply run brew install caskroom/cask/brew-cask, and you’re all set. Then to install an application, it’s just brew cask install <application name>. You can search for available apps just by doing brew cask search <something>. This is useful to find the exact name of something.
You can even use Cask to install fonts and specific versions of software, if you’d like.
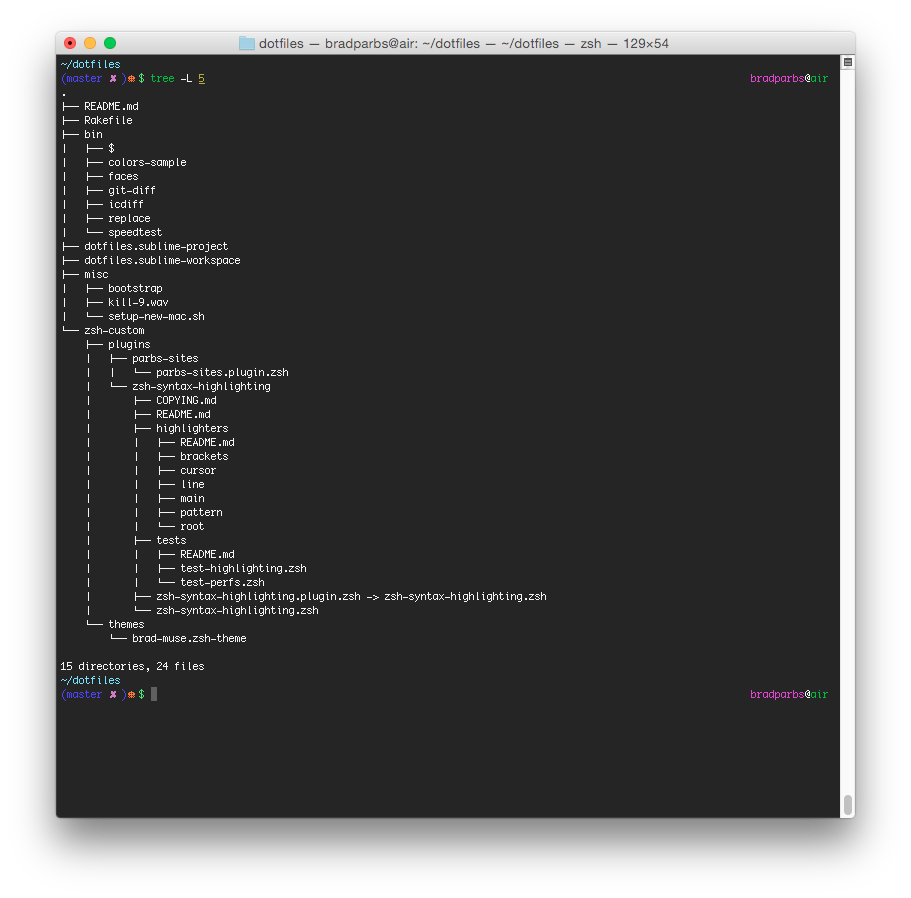
Dotfiles
One thing you’ll notice is that now you’ll probably have a large amount of these hidden files on your system. You probably want to keep your customizations that you’ve done for Zsh and other things. I recommend using a system like I use to keep them under version control. You can also very quickly copy them onto another server, to make your settings the same anywhere you go.
I’ve created a repo on Github that contains all of my dot files, and you are more than welcome to use it as a starting place.
The general concept of keeping your dotfiles under version control is that you want to move all of the important ones into a folder, and then make a “shortcut” from the original location to that new folder. There are many ways to do this, but the way I’ve done it is using a simple Rakefile
. In your new folder, you can just run the command rake, and it will create the correct files for you in the correct place.
There are a number of different tools that do the same thing, such as Dotbot , Dotfiles framework , or one of my favorites, Homesick . Each one of these has a bit different way to install and use them, so read up on it.
More on my dotfiles
You’ll notice as you look at my dotfiles, there are some things we didn’t cover, but are useful to point out:
I have a .gemrc
file that speeds up gem installation by not bringing over documentation or tests for any gems I install. I recommend this, as it really helps for anything you need to do gem install <something> for.
I also have a .zlogin file, which gets included by default in zsh. I have it check for the existence of a specific directory, and if that exists, it will go into it. I use this for VVV to automatically go to my sites folder when I SSH into Vagrant.
There is also .hushlogin , which will suppress any “Welcome” messages on a remote server when you SSH in. This file can be empty.
I use a global .gitignore file, so that I don’t need to add a ton of things to each of my gitignore files. This is helpful as there are a lot of file types you never want in version control.
I also have a folder of different scripts and commands . Most of these are things a bit bigger than would be manageable in my .aliases or .functions file, so they go here. They are documented in the README , and there are some useful things there.
Lastly, I have a file to set up my dotfiles on a new server , and one to set up an entirely new Mac . These are things you probably don’t need, but helpful to have an example of how to do it if you need to.
Outro
Hopefully, by now you’ll have a great setup for your command line. There are a lot more tools out there that I didn’t cover, but these are the ones I use on a daily basis. It’s very easy to add in tools, but just be cautious to only add things you’ll actually use.